Step 1:
Connect your GPS to your computer with the serial port connector or USB and turn your GPS.
Step 2:
Start
DNR Garmin. You should see a box almost or exactly identical to the one below.
Step 3:
Set the projection needed (you should only have to do this once) and press OK
- refer to screenshots below:
Step 4:
Start
ArcMap either by itself or from a Toolkit folder that you are working on.
Step 5:
If you want to upload a
shapefile you will need to highlight the layer name that you wish to upload.
Step 6:
After you have the layer selected you need to go back to DNR Garmin (It should already be open)
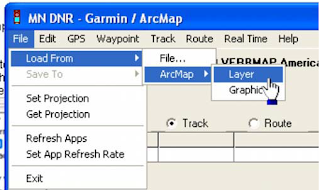
and click on File>Load From>ArcMap>Layer. You can also upload a graphic from ArcMap as well,
you just need to digitize the graphic (point, line or polygon) and select it with your pointer, then
click on graphic instead of layer (in the step displayed below).
 |
| Ajouter une légende |
Step 7 :
After you click on Layer, the data will upload and your screen should look something like the screen capture below. By default, points are brought in as waypoints and polygons and lines are brought in as tracks.
Step 8:
The next step is to click on track (since we loaded a polygon) and the click on upload.
Step 9:
You should verify on your GPS that the data has been transferred correctly before you go to the field. To do this you can use the pan map feature on your GPS and zoom into the anticipated location of your data and verify that it has been transferred correctly.
