Affichage des articles dont le libellé est Shape file. Afficher tous les articles

jeudi 27 décembre 2012

How to upload Geospatial Data from ArcMap to a Garmin GPS


Step 1:
Connect your GPS to your computer with the serial port connector or USB and turn your GPS.

Step 2:
Start DNR Garmin. You should see a box almost or exactly identical to the one below.
DNR

Step 3:
Set the projection needed  (you should only have to do this once) and press OK
- refer to screenshots below:
DNR


Step 4:
Start ArcMap either by itself or from a Toolkit folder that you are working on.


Step 5:
If you want to upload a  shapefile you will need to highlight the layer name that you wish to upload.

Step 6:
After you have the layer selected you need to go back to DNR Garmin (It should already be open)
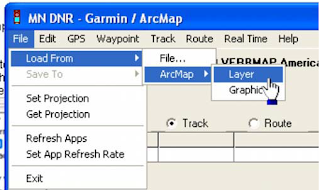
and click on File>Load From>ArcMap>Layer. You can also upload a graphic from ArcMap as well,
you just need to digitize the graphic (point, line or polygon) and select it with your pointer, then
click on graphic instead of layer (in the step displayed below).
DNR
Ajouter une légende
Step 7 :
After you click on Layer, the data will upload and your screen should look something like the screen capture below. By default, points are brought in as waypoints and polygons and lines are brought in as tracks.

DNR
Step 8:
The next step is to click on track (since we loaded a polygon) and the click on upload.

DNR


 Step 9:
You should verify on your GPS that the data has been transferred correctly before you go to the field. To do this you can use the pan map feature on your GPS and zoom into the anticipated location of your data and verify that it has been transferred correctly.


mardi 25 décembre 2012

Using the DNR Garmin Extension to Download Waypoints from a GPS Unit


The DNR Garmin is a GPS extension that works with ArcView, ArcMap (8.x, 9.x, 10.x), Landview or ArcExplorer. 
With this extension you can transfer your Garmin GPS waypoints, tracks or routes directly to one of the above programs above and save your data as Graphics or Shapefiles.
In our example we will show how to use DNRgarmin with ArcMap. Before launching the program you should plug your device into the PC.

Plug in the cable in the one of the USB Ports if you are using a “USB” cable or into the “Serial” port if you are using that type of cable.
Please note if you are using Windows XP a “USB” cable might not work properly. Our advice is to use the “Serial” port if you are working on XP.

Step 1

Launch the program by double clicking on the desktop icon.  

Step 1-1:
The program interface will appear like below :

DNR_1


Step1-2:
 The program will try to connect to your GPS device and Check if your device is properly connected to the port and follow the instructions in the message.
Step 2:

Configure your program by clicking on “GPSà Set Portà USB” (if you are using USB cable) or “Port 1” (if you are using Serial).
DNR_2

If your GPS is connected to the program you should see “Connected” in the bottom left corner of the program window.
The program is ready to retrieve your data.
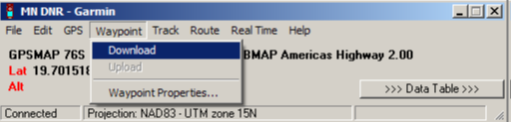
Click on “Waypoint” and then “Download” to download your waypoints into the program.
Or click on “Track” => “Download” if you want to download your Tracks.

DNR_1


After the data is downloaded you will receive a message stating the number of records received.
Step 3:

Click on “>>> Data Table >>>” to see the properties of the downloaded data.
Now you are able to edit your data as needed.
After editing your data, save your data as a shapefile to use it in ArcMap.

DNR_Garmin


Please note: DNRgarmin does not create a projection file (*.prj). You will need to define the projection in ArcCatalog or ArcMap to have a projection associated with your shapefile.

mercredi 19 décembre 2012

Correction d'un Shape file endomagé

Pour corriger  un shape file endommagé, Shapechk  est un utiltaire intéressant qui le  permet, il suffit juste de  le télécharger :  shapechk.exe


La première étape consiste à cliquer sur le bouton  pour sélectionner le fichier de formes endommagé.


L'étape suivante est optionnelle. Il s'agit de cliquer sur le bouton . Ce bouton permet de lire l'en-tête de la donnée mais ne corrige en rien la donnée.

En revanche, le bouton  contrôle le fichier .shx et le génère si cela s'avère nécessaire.


Pour terminer le dernier bouton  contrôle le fichier .dbf. Il permet d'ajouter des lignes à la table attributaire si cela s'avère nécessaire ou d'en supprimer s'il y a des lignes en trop (plus exactement à supprimer les lignes ne correspondant à aucune entité géographique).


Obtaining shapefiles from OSM data


Open Street Map

This is where you can find extracts of maps from different places around the world. From here you can download:
  • OSM XML extracts by country
  • Garmin Map Files (OSM.err edition)
  • Osmosis country bounding polygon
  • Shapefile extracts by country
  • Navit maps by country
  • GPX POI by country
  • TomTom POI by country
  • OSM XML feature extracts by country
  • Adobe Illustrator files by country
The files provided on these pages are created from OpenStreetMap map data. Because OpenStreetMap is a work in progress many of the countries are only partially mapped or are incomplete. The data contained on these pages has not been checked or verified  and we don't recommend using it for any mission critical applications.